Wednesday, March 31, 2010

For the Birds

I have always loved birds. Maybe it's because I grew up on Cardinal Loop. In our previous homes, I had feeders. I would now, if not for our plans to move. (Our neighbors are avid bird enthusiasts, so they take very good care of the birds.) I would have a bird as a pet if I knew our dog wouldn't eat it. Eww. Anyway, when I saw the Brown Bird Toile dinnerware from Andrea by Sadek, I fell in love.


Please join me in the kitchen for a casual dinner.

I only bought the bird toile salad plates, because already had the cream dinnerware to compliment them. The cream dinnerware is our everyday dinnerware from Bombay (RIP). The rattan chargers came from Walmart for $3 each. Hopefully the stain isn't toxic! I used simple flatware by Gibson with a beaded edge pattern and plain Riedel stemware. The cream napkins are a Goodwill find. Six for about $3! Washed, ironed, and good to go!

I love the detail! Each plate has a slightly different scene.

For the centerpiece, I shopped the house to find bird/natural pieces. I used my new glass cloche with a nest and my bronze bird. You can read about my cloche project here. I borrowed the faux fern from another room to put on the barley twist pedestal. I normally don't like fake flowers and plants, but I can't keep an indoor fern alive to save my life. My talents are few and gardening isn't one of them. I'll just stick to tablescaping for now!

Thank you for coming by! Please visit Susan at Between Naps on the Porch for Tablescape Thursday to view more beautiful tables.

Sunday, March 28, 2010

The Bell Tolls For Me!

For about three years (before the bird craze hit), I have had a nest on a shelf in our living room. I covered the nest with a small glass cheese dome and I change it with the seasons. For winter the nest is covered with ice crystals, spring with eggs, summer bare and fall with leaves. I never thought the cheese dome was good enough, but didn't want to pay $30+ for a large cloche. Here it is before:
Kind of squat, right?

I have seen several bloggers (sorry, can't remember who) make their own cloches so I thought, "Gee, I can do that, too!"
*Edit* Joan at Anything Goes Here was one of my inspirations. Check out one of her cloches here.


I found this beauty at Goodwill recently for $1.51! Perfect cloche shape!


It was originally a hurricane globe, but I easily removed the brass candle poker-thingamajig.

I found this crystal ball wine stopper in a drawer, long forgotten (if you are reading this and gave us this as a gift, at least it's now being used, right?). I thought it would be perfect for the topper.


I cut away the rubber piece. All I had to do was hot glue the stopper into the opening. Easy peasy.


The end result. My $1.51 (+ tax) cloche! You like? Me, too!

Thank you for stopping by! And many thanks to Susan, RhodaCindy and Linda for hosting me! Please stop by their sites to view many other great projects and thrifty finds!


 http://linda-coastalcharm.blogspot.com/


Wednesday, March 24, 2010

Easter's On Its Way

We are hosting my husband's family for Easter lunch this year and I wanted to set an extra-special table. Since tablescaping seems to be a newfound hobby, I can't let them down.

Welcome to Easter lunch.

I fell in love with the Bordallo Pinheiro dishes the first time I saw them. After my awesome thrifty find of the cabbage soup tureen and bowls (read about that here), I broke down and bought the green dinner plates and bowl at Ross. Couldn't stop there. Nooo-oh. I had to have the pink salad plates, too. As luck would have it, I found a great deal on them on eBay. They just arrived today (yes, I washed them before I put them out, thankyouverymuch).

In addition to the new plates and bowls, I purchased the placemats to accent the pink at JC Penny. I used our wedding crystal (Miller Rogaska, Soho Platinum) and flatware (Lenox Federal Platinum). We won't be having wine for lunch, but the table looked naked with just one glass.

I feel like now's the time to let you know that I DEEPLY regret not registering for real silver. I also kinda wish I didn't pick out crystal with a metallic rim, but I don't want to complain too much! At least we have it, right? For that I'm very thankful!

This is a better look at the pink plates.

I found these cute egg picks at Michaels. I alternated pink and green and stuck them in napkin pockets. Have you noticed the tablecloth? My grandmother crocheted it for us when we got married. She made it to fit our table perfectly. Guess we can never get a new table!

I had to include my bunny with his basket full of Easter joys! I placed him on some paper leaves and put some reproduction vintage eggs in his basket.

A view of Bunny's eggs.

I scattered my bunny tealights around the table.

My mom gave me this little crystal bunny. I put him at big bunny's feet.

Now that I have the table set, I need to plan my menu. Anything that requires the least amount of cooking sounds good to me!

Thank you for stopping by! If you're not coming from Susan's, please visit her at Between Naps on the Porch for Tablescape Thursday!

$5 Challenge - Matchstick Candle and Coasters

Just call me Miss Piggy. This is my third and final project for Lindsay's Five Dollar Challenge. She did say we could do as many as we wanted, right? Maybe I got a little carried away...


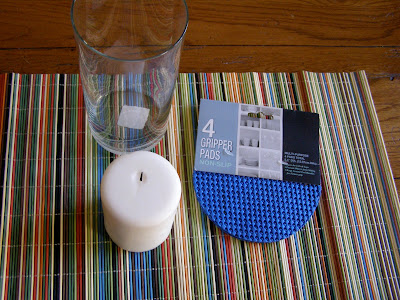
During my Dollar Tree shopping extravaganza, I picked up a colorful matchstick placemat, a pillar candle, a glass cylinder vase and some foam gripper pads. I only spent $4 for the $5 challenge, so I'm not sure if that's grounds for disqualification.
Sorry, I lit the candle before I took the picture. Gotta remember I'm new at this! What to do, what to do?

First, I rolled the glass vase in the placemat to measure where to cut.

Then I cut the placemat to fit around the vase. I cut the length as well as the length because I didn't want the placemat to be taller than the vase.

I rolled the vase in the placemat and hot glued the ends in place.

Here's the finished product with the lit candle. Purdy, huh? I think this would look great on a patio or porch!

I decided to make coasters with the leftover placemat. I cut the scrap pieces to size.

I hot glued the threads to keep the sticks in place.

In order to give the coasters some support, I hot glued the gripper pads to the back. Without the pads, the matchstick pieces were flimsy and slippery.

Finally, I trimmed the gripper pads to fit. Ok, they're not so pretty from this side, but who's going to be looking here anyway?

Four coasters and a candle holder for $4. And they only took about 10 minutes to make! I definitely think I'll be using these on my porch this spring and summer!

I know this post was long, but if you made it to the end, thanks for sticking with me!  (No pun intended.) Merci, Lindsay for hosting this fun challenge!

$5 Challenge - Twine Tealight

This is my second project for Lindsay's Five Dollar Challenge. Please visit her and the other participants to see all of the great, budget friendly ideas!


It seems like everyone is covering everything in twine these days, so I jumped on the bandwagon, too. I won't say that this idea is very original, but it's so cute and easy!
I guess this is technically a $2 challenge (since I'm using a leftover pot from another challenge project), but I suppose I could have purchased more pots/twine/candles to total $5. All of these items came from Dollar Tree.


I started by hot gluing the end of the twine to the side of the pot at the bottom.


Then I tightly wrapped the twine around the pot.
When I got to the lip of the top of the pot, I added some more glue so the twine wouldn't slip off the rim.
After the pot was covered, I glued down the end of the twine and tucked it in so it would not be as noticeable.

(I feel a little "like duh" giving this disclaimer but I feel it's necessary!) *VERY IMPORTANT* Twine CAN and WILL catch on fire! Be sure to cut off all of the loose fibers that will be around the top of the pot so it doesn't catch on fire if you use this as a tealight! And do not leave lit candles unattended! Ok, I feel better.

Yes, I need to follow my own advice and snip around the top of mine. But don't these make the cutest little tealights? These would look great with a country farmhouse look or a beach theme. I have tons of twine left over so now I need to find something else to wrap!

Thanks for stopping by! Again, muchas gracias, Lindsay for hosting the Five Dollar Challenge!

$5 Challenge - Spring Topiaries

If you've read my blog before (chances are you haven't), you know that I'm new to this. I didn't start reading home decor blogs until late last year (I know...I know...been missing out)! When I did discover them, however, Living With Lindsay quickly became one of my favorites. I later found out that Lindsay is friends with my best friend in TX! What a small world! She encouraged me to start a blog, so I did. And of course I had to participate in her Five Dollar Challenge!


At first, I was overwhelmed with the task of creating something with only $5 of supplies from the dollar store. But when I looked around Dollar Tree, I got all kinds of ideas. Once I started, I couldn't stop! (I hope I'm not being a challenge hog!)

These spring topiaries are first in a series of three crafts.

I bought a package of floral foam blocks, floral moss, mini terra cotta pots and two yellow/white bead ball thingies from Dollar Tree. I rooted through the woods behind our house to find two sticks of similar size. Don't tell him, but I "borrowed" some of my oldest son's paint and paint brush.


First, I lightly brushed some white paint onto the pots. I rubbed them with a paper towel before they were dry to give them an aged look.


Next, I cut blocks of foam down to fit inside the pots.


I made sure the foam was tight so the topiaries wouldn't wobble.


I snipped the ribbon off of the balls. Exactly what these balls are intended for, I'm not sure, but they make really cute topiary toppers!

I shoved the free backyard sticks into the balls and then hot glued the sticks into the foam.

I wanted to make sure the topiaries wouldn't fall out!

To finish, I covered the foam with moss and hot glued the scrap ribbon to the pots. Voila! Two spring topiaries for $5! I think these would be super cute on a spring dining table as decorations or place card holders.

Thanks for stopping by. Also, many thanks to Lindsay for hosting the Five Dollar Challenge!